Monday, August 29, 2011

My first GIVEAWAY

Fall is in the air.  It's a bit early, it seems, but it's there.  Crisp mornings.  Yellowing of the leaves.  Dusk after dinner instead of when I'm tucking the boys into bed.

I adore fall.  I love the clothes I get to wear, the energy the cooler weather brings, the excitement of the holidays.  The soups and stews.  The pies.  Oh, the pies.   Apple, strawberry, raspberry.  PiePie. Pie


With pies in mind, I present you with my first ever giveaway item.

 Williams-Sanoma Pie Crust Cutters! 


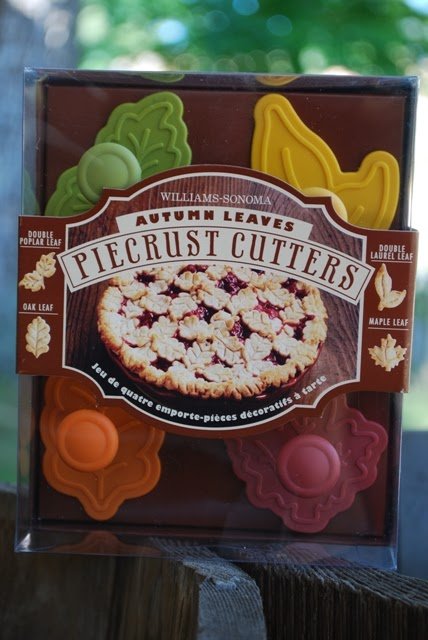
Makes any ole pie crust that much fancier!  Use a little or use a lot.  Just have fun with it!  Comes new in box with 4 of these niffy little cutters! 


I always look at giveaways and wish I could win something.

I've also recently realized how good a giveaway can be to broaden your "fan base".  Seeing as I only know of 17 people who currently follow this little blog, I would love to get the word out more on these healthy meals I'm making and creating!  (Speaking of following -- if you want to and don't already, please follow me or subscribe via email on the sidebar!)

So to enter to win this little bloggy giveaway: just comment!  That's it.  If you tell me something cool, like what kind of dish you'd like to see on here, or what dish you've really enjoyed from the site, well, that's helpful, too.  ALSO, you can comment a second time, if you blog or Facebook about this giveaway and link to the blog! Giveaway will close Friday at 10pm, EST.

I will randomly pick (with the help of the computer) one winner to receive the adorable pie crust cutters!  (I will ship anywhere in the US or to an APO address!)

PS:  I'm going to see how many comments I can garnish.  I'm hoping more than 5, my current "high comment number". haha.

Just for the record, I love it when people comment.  It lets me know the blog is being utilized so that on days I just don't feel like putting up another recipe, I know that there are actually people out there who may benefit from what ever it is I've made.

Saturday, August 27, 2011

Black Bean Sweet Potato Burgers


These are amazing!  This is a burger that Ashley made all on her own and I'm so happy to report that I only made one minor tweak -- and only because I didn't have one of the ingredients on hand.  but I loved the change (fennel instead of sunflower seeds)! 

They were hearty, delicious, and just what a beautiful Friday night called for!

before baking

 Bake, pan fry, or grill them.  You could even just eat the "dough" plain.   Either way, you should just make sure you make them!

after baking

I served these with some Greek Eggplant from the other night and an Herbed Polenta that I'm working on perfecting.

Black Bean Sweet Potato Burgers
Serves 8
  • 1 can black beans - rinsed and drained
  • 3 c cubed sweet potatoes (skins on) - about 2 large ones
  • 1/2 c corn
  • 3/4 c chopped onion - about 1/2 a medium onion
  • 2 T minced garlic
  • 1/2 c cooked quinoa
  • 6 T rolled oats - pulsed halfway to "flour"
  • 1 t cumin
  • 1 t basil
  • 1 t oregano
  • 1 T fennel
  • 1 T OO
-- Mash half the black beans until they are all pasty.  Add the other half in and mash/stir just slightly.
-- Smush the sweet potatoes.  You don't want them to be the consistency of mashed potatoes.
-- Combine everything in a large bowl and mix.
-- With a 1/2 c measuring cup, "spoon" mixture into your hands and make into 8 patties.  Place on a greased cookie sheet and slide into the fridge to "set" for a little bit.
-- Bake for 30 minutes (15 minutes each side) at 375.  Pan fry for 6-8 minutes each side in a little hot oil.  Grill by baking for 25 minutes (15 mins on one side, 10 on the other) and then grilling for the remaining bit.
-- Serve on whole wheat buns with your favorite burger toppings!

Greek Eggplant

 [Source]

When my parents hit their 25 year mark after their "I Dos" - they took a trip to Greece.  And not a normal run-of-the-mill cruise trips.  They went on a small little tour boat that fit only 20 couples.  They were able to dock in small ports and go inland and sit in authentic Grecian homes and eat authentic Grecian food.

I was so jealous.

Since their trip, one of their favorite side dishes to make is what they simply call "Greek Eggplant".  Sauteed or roasted eggplant chunks with loads of garlic, some herbs, and either potatoes or tomatoes.

My only word of advice if you're not familiar with eggplant is that it shrinks and cooks down.  So beware!


Greek Eggplant
Serves 6-8
  • OO for pan
  • 1 large eggplant - cut into 1 inch cubes
  • 6 cloves garlic (to taste) - minced 
  • 1 T Rosemary
  • 1 pint Cherry tomatoes (cut in half)
-- Heat oil in pan and, once hot, add the garlic, rosemary, and eggplant.  Saute until almost all soft.  (sometimes, I microwave eggplant for a few minutes to speed up the cooking process)
-- Add the tomatoes and continue sauteing until all is soft and fragrant.


Peanut Yum Sauce (with vegetables and rice)


I am a planner.  I like to know what's going on for the week a week in advance.  I like to have vacations planned out to the day.  I like to lay my clothes out (and the boys clothes) the night before.

This doesn't always happen, but it's the way I prefer.

I also meal plan.  For me, it's the easiest way to shop and cook.  There's no, Oh, this looks good....but I don't have what I need.  Planning meals out for 2 weeks is just the way I do things and it works for me.  I love picking out what I'm going to feed my family.  I look at blogs and cookbooks.  I make sure there is balance -- no one wants to eat 3 lentil-heavy meals in one week, right?  Well, when I went to meal plan and write out my grocery list this past week, I goofed.  I had written down: Mama Pea's Peanut Sauce.  And so I wrote down the ingredients for the sauce and only the sauce.  Oops.

So when I got around to making dinner Thursday night, I realized that we would all be a little hungry after consuming just the sauce.  Good as it was, we would have been hungry.  Thankfully, I cooked up some brown rice and cleaned my freezer out of all the leftover bags of veggies and we had a tasty and filling meal.

No one was the wiser to my goof and everyone loved it!  I loved how insanely quick and easy it was.  Seriously, if I had instant brown rice on hand (or hand some pre-made) this would have taken 10 minutes to put on the table.  No joke.  I tweaked the recipe - surprise surprise - you'd think with my planner ways that I would stick with a recipe but for the life of me I just can't!


Peanut Yum Sauce (with vegetables and rice)

Serves 6
Active time: 10 minutes
Cook Time: 45 minutes (if you have to cook your rice)
Total time: 50 minutes
Serving Suggestions: Round this meal out with a small bowl of soup (a pureed creamy vegetable sort) or a big green salad chocked full of more raw veggies.

What you'll need:

  • 1 1/2 cups dry brown rice OR instant brown rice + 3 cups of water
  • 2  1lb (16 oz) bags frozen California Blend vegetables (broccoli, cauliflower, carrots) OR 6 cups frozen vegetables (great way to clean out those "end of the bag" frozen veggies)
  • 1 box silken tofu, drained
  • 1/2 tsp coconut extract
  • 3/4 cup natural peanut butter
  • 3 TBLS soy sauce OR Tamari
  • 1 TBLS lime juice
  • 2 tsp powdered ginger
  • 1 TBLS minced garlic
  • 1 TBLS agave OR honey
  • ¼-1/2  tsp Cayenne pepper (to taste)
  • Salt to taste
  • 1 cup unsalted dry roasted peanuts for garnish (optional)

What you'll do:

  • Cook your rice with the water.
  • Steam, Microwave, or Roast (400 for 30 minutes with a little olive oil) vegetables until soft and tender.
  • Combine the remaining ingredients (except the peanuts) in a blender or food processor and pulse until smooth and creamy.
  • When the vegetables and rice are done, combine with the sauce in a large bowl and stir until everything is coated nicely.
  • Serve with the peanuts sprinkled on top if desired.

Time Tip:  Cook your rice ahead of time

Nutrition Facts (per serving, 1/6 of recipe):
Calories 453 (Calories from fat 179); Total Fat 20g (Saturated 4g); Cholesterol0mg; Sodium 513mg; Potassium 669mg; Total Carbohydrate 56g (Dietary Fiber 8g); Sugars 10g; Protein 18g; Vitamins/Minerals - Vitamin A 6638 IU; Vitamin C 53mg; Calcium 139mg; Iron 3mg; Folate 102mcg


Wednesday, August 24, 2011

Grilled Eggplant Sandwiches


Scot and I ate sandwiches very similar to these when we were on our trip to Niagara Falls.  They were amazing and I knew I had to try and recreate them.  They were originally served on Ficoccia bread, and next time I'll do that instead of Sandwich Thins just to give the sandwich a little more bulk.

Let me first say that this is not a typical lunch-time sandwich.  It took about an hour to put everything together - but most of that was making the caramelized onions, which, as you know if you've tasted them, just make everything taste better!


I used my mini-Foreman Grill, you could you a regular sized one or even roast everything in the oven.  It's a very flexible "recipe" and oh so mouthwatering. 

 Oh, and if you're not an eggplant fan, don't worry, you practically won't even know it's there!  The caramelized onions are really what set this sandwich apart, so don't skip them!  It takes a bit of time, but they keep for about a week in the fridge -- so make a ton and save what you don't use for a future meal (or just eat by the spoonful when no one's looking!).


Grilled Eggplant Sandwiches
Serves 4

  • 1 small eggplant, sliced in 1/2 inch slices (you want enough -- after they shrink -- to be a layer on each sandwich)
  • 1 container of Portabella mushroom caps (whole is preferable, but sliced is fine, too)
  • 2 red peppers - roasted.  (the jarred variety is just fine!)
  • Caramelized onions -- you'll probably want at least 2 or 3 onions for this recipes alone
  • Ficoccia bread or some type of whole wheat bread - but I would suggest Ficoccia
  • Some OO and just a little rosemary
-- Start caramelizing your onions!  Oh, and enjoy the process!
-- Meanwhile, grill or roast the eggplant (you can microwave the slices for a few minutes beforehand to speed up the process), Portabella caps, and red peppers if you're using raw (not jarred)
-- Once everything is ready, you're good to assemble.  Mix a little OO with some Rosemary and brush on the inside of the bread.  Layer the eggplant, mushrooms, peppers, and a heaping spoonful of onions on the sandwich.
-- Grill and enjoy!

I served this with a salad and some Vegan Strawberry Soup.  Delightful!

Lentil Pasta Sauce


I love pasta with a good sauce.  We already have a good bulked up pasta sauce, but I wanted something that was choked-full of veggies and something for protein.

So I figured a vegan version of a Bolognese Sauce would be a good start.  The sauce is a little drier than a "typical" pasta sauce, but it is so good!


Lentil [Bolognese] Pasta Sauce
Serves 8
  • 1 8 ox box mushrooms, chopped fine
  • 1 onion, rough chopped
  • 2 cloves garlic, or 2 tsp minced
  • 1 cup rough chopped carrots
  • 1 cup rough chopped leek, white part only
  • 1/2 cup rough chopped celery
  • 2 cups cooked lentils (1 cup dry + 2 cups water)
  • 1/2 cup vegetable broth 
  • 1 tsp thyme
  • 1 tsp oregano
  • 1 tsp basil
  • 1/4 cup red wine
  • 2 cans petite diced tomatoes, with juice (can you regular diced as well)
  • 2-4 TBLS tomato paste
  • salt and pepper to taste
  • 1 lb whole wheat pasta -- a short variety.  OR -- polenta
-- Cook lentils (I use my rice cooker - saves so much time and effort!) if you haven't already.
-- Meanwhile, in a food processor, pulse onion, garlic, carrot, leek and celery until coarsely chopped
-- In a large pot, saute onion mixture with mushroom about 10 minutes.  Until all is soft, but not yet browned
-- Add lentils, broth, herbs, wine, and milk.  Cook 3-5 minutes, stirring occasionally.
-- Stir in tomatoes and paste.  Reduce heat to low, cover and simmer 10 minutes.  Stir to prevent sticking.
-- Season with salt and pepper and serve over cooked pasta or a bowl of polenta.


Carmelized Onions

There are very few dishes I so thoroughly enjoying making than caramelized onions.

If I have the time, that is.  As in, an hour of time.

And no boys running around my feet.

And so yesterday, with an entire nap-time to do as I wished, I chopped 5 onions and set to caramelizing.  I also had a book to read, so I read, stirred, read and read, scraped, stirred, and read some more.


Oh the bubbling.  The delightful aroma.  The scraping of little caramelized bits. 

It's amazing that a whole pan full of raw onions turns into this:


Oh yum.  This is a great site to references if you've never made these delicious onions.  Top sandwiches or burgers with them -- soups and stews are set a notch above with them added. 

They even make a spoon taste better. 

Tuesday, August 23, 2011

Breakfast Burritos: Vegan Style

You know how I've said my dearest Scot eats Steel-cut oats for breakfast every morning?

Well, no more.  He still eats them most mornings, but in order to not let him get completely bored with them, I set about to make a hearty breakfast burrito for him so that when a bowl of oatmeal was just a little less than appealing, he could reach into the freezer and grab something healthy and tasty and totally not oatmeal-y.

So I present to you:  Breakfast Burritos: Vegan Style.


Doesn't that look just amazing?  So healthy and fresh and packed with nutritious goodness and, of course, love.

I made these with enchillada sized tortillas.  A little on the small size I realized once I rolled them up.


Oops.

Next time, I'll use actual burrito sized ones.  For this round, Scot is a great sport and is just heating the burrito up in the plastic and then unwrapping it and eating it more like you would Huevos Rancheros.


So here's what I did.

Breakfast Burrito: Vegan Style
Makes 6

  • 6 burrito sized (the larger ones) whole wheat tortillas or 8 enchilada sized ones (for those of us who maybe don't each as much as a man in the morning)
  • 3 c prepared quinoa
  • 1 bag loose leaf spinach (you most likely won't use but half of this.  save the rest for a salad!)
  • 1 container mushrooms - sliced
  • 1 can black beans - rinsed and drained
  • 1 1/2 c (or so) of your favorite chunky salsa
  • Plastic wrap and tin foil if you're freezing them
-- Simply cook the quinoa while prepping everything else.  It won't take this long, but at least when the quinoa is done you'll be ready!
-- Lay some quinoa down on the tortillas, sprinkle and handful of spinach on each one. Next, take the sliced mushrooms and evenly distribute, do the same with the beans.  Last, drizzle your favorite salsa on top!
--To fold, take one side and pull it all the way over and almost tuck it under the food.  Fold the bottom up and then take the last side and pull it over.
--Wrap in the plastic wrap and tin foil and keep in the freezer until ready.
--Microwave for 2-3 minutes until thawed and warm (or hot).

Friday, August 19, 2011

Honey Baked Lentils


This was a total risk meal.

I found the recipe in an old cookbook of my mothers and changed it up a bit.

There was no picture. There was no serving suggestions. There was no "this is a side dish" or "this is a main dish" denotations.

The worst thing that could happen is that it wasn't filling enough or didn't match what I had as sides for the meal.  Right?

Much to my surprise:  it was great.  A little out of the ordinary considering our usual all-in-one type dishes.  It seemed a little plain at first, but then I took a bite.  And then another. I didn't stop until my pile of lentils was gone.  Every. Last. One.

So it's a winner in my book.  It's nothing fancy, that's for sure.  Sometimes you'll have just a piece of meat on the plate with sides, right?  So this was my "plain piece of meat" replacement - and paired with a wonderful hearty bread, it is a complete protein and my body was happy.  So was the husband.

I had steamed broccoli and a salad to go with this, too.

Honey Baked Lentils
Serves 8
Active time: 5 Minutes
Cook Time: 30 minutes
Total time: 35 minutes
Serving Suggestions: With a soup that doesn't have a huge protein component, like a sweet potato or carrot soup, accompanied with a green salad and some bread or potatoes. Or, treat it like you would a piece of chicken and just add sides and a roll to your plate.

What you'll need:

  • 2 cups dry lentils, picked over and rinsed
  • 4 cups of water
  • 3 TBLS honey
  • 1 TBLS soy sauce OR tamari
  • 1/2 tsp powdered ginger
  • 3/4 tsp dry mustard

What you'll do:

  • Cook your lentils in water until soft.
  • In a small bowl mix the remaining ingredients.
  • When the lentils are done,drain them from any excess water if needed, and transfer them to a serving bowl.  Pour the "sauce" over the lentils and stir gently with a spoon until all combined.


Some Additions

I've made some additional remarks and changes to some of the recipes I have on here that I've made this past week or just realized - oh hey, everyone else should know about this, too!

So here you have some of the additions!


Chickpea Pasta Sauce

One of our family favorites around here.  I think I could make this once a week and get zero complaints.  But I don't.  I try to broaden my horizons.  But it does make it onto a least one week's meal plan a month.  If not, I think I would find the dearest husband in the kitchen trying to make it himself.

Which he could.  It's that easy.


Baked Oatmeal

Another family favorite even before we went heart healthy!  ...and I've now made it vegan!


Hummus

This is my go-to quick and easy appetizer.  Whip it up (in a double batch, of course), pull out a bag of pretzels, some slices carrots or celery, or the best, some pita chips, and you're golden!  I have 4 new variations on the already amazing original recipe!

Enjoy!

Wednesday, August 17, 2011

Salads

With almost every single heart healthy dish I say something to the effect of "...and I served this with a big green salad." or "...and just toss a great salad together and you're good to go."

What does my mystery salad look like, you ask?

Pretty much whatever I have on hand.

Most of the time, it's spring greens from the huge plastic bin in my fridge that I get at a local discount market. The same exact stuff they sell in Whole Foods but for half the price becasue the expiration date is a week away.  Seeing as how we go through these huge tubs of salad so fast, this has never been an issue.

I usually get the Mixed box - half Spring Greens and half Spinach.  If I don't get one of those, I'll sometimes find a good deal on Aritsan lettuce and just chop that up as we need it.  And sometimes I'll get those bags of three romaine lettuce heads and a bag of spinach and mix those up.

For toppings, I use whatever I have on hand.  Chickpeas, almonds, raisins, crainsins, carrots, tomatoes, flax seeds.  Sometimes together, sometimes not.  It just depends on what we're having and what I think will go. 

And always with a little dressing.

I hope this helps!

Yum Sauce with Tofu and Vegetables

I think this may be my new favorite meal.  Seriously.  Out of all the new heart healthy meals I've made, this is my new favorite.

It's so quick.  So easy.  Full of nutrition and amazingly flavorful!  What's not to love?

I got the sauce recipe (and the meal idea) from Mama Pea and now I'm in love, too.  Granted, I've never been to this Yumm Restaurant they talked about, so I'm not sure how close what I made tastes like the original -- but I will say that I made this as Momma Pea instructed and I didn't like it too much.  Too much lemon juice and the spices were off for me.  So I made another batch without any lemon juice and different spices, combined both batches and then I loved it!

And so did everyone else.

As for the meal, it's simple. And please don't overlook this because of the tofu - it's amazing marinated and then broiled!  And if you're not into tofu, then this would also be great with chunks of grilled chicken!  YUM!


Yum Sauce with Tofu and Vegetable
Serves 4

Tofu
  • 1 block extra firm tofu - cut into 1/2 inch slabs
  • 2 T Tamari or Soy Sauce
  • 1 T lemon juice
  • 1 T honey/agave
  • 1 T water
  • 1 t minced garlic
  • 1/2 t cumin
-- Lay slices of tofu on a cutting board and with a clean cloth, press out liquid without breaking the tofu apart. :)
-- Mix marinade together in a large bowl and then transfer the tofu into it.  Let sit until you need it.
-- When you need it: place tofu pieces on a lightly greased cookie sheet, drizzle remaining marinade on top, and broil for 8 minutes each side until brown and slightly crispy.  Cut into strips.

Sauce - makes 1 1/2 cups
  • 1/4 c canola oil
  • 1/4 c almonds
  • 1/4 c chickpeas - rinsed and drained and the remaining chickpeas set aside
  • 1/2 c water
  • 1/4 c nutritional yeast
  • 1 T lemon juice
  • 1 t minced garlic
  • 3/4 t curry powder
  • 1 t Herbs de Provence (or any combination of sweeter Italian spices)
-- In food processor or blender, pulse almonds, chickpeas,water and oil together until smooth.  Add remaining ingredients and pulse until smooth, scraping sides to make sure you don't leave any goodness behind.


Other ingredients
  • 2 cups cooked brown rice
  • 1 16oz bag frozen California blend vegetables (Broccoli, Cauliflower, Carrots) - steamed
  • Remaining chickpeas

To plate:  Lay down a bed of rice with steamed veggies over top.  Sprinkle some chickpeas on top along with some tofu (more than is pictured!).  Drizzle on some sauce.  And then some more.  And then lick the spoon.


Friday, August 12, 2011

Curried Banana Spinach Pie

If you are reading this -- good for you!  You did better than I did the first time Scot and I went to our favorite restaurant and I glanced at the description of this dish.  Of course, the odd combination lured my dear husband right in and he ordered.  I remember being slightly disappointed that were weren't going to be able to execute our usual arrangement - halvsies.

Once the food arrived and he took a bite, his eyes growing large, he insisted that I, too, take a bite to decide for myself.

And then I was truly disappointed that I didn't order the meal myself!  Since then when ever we've gone back to that restaurant, one of us always gets the Spinach Pie with curry sauce, falafel, and bananas.  I know, I know, an odd combination to say the least, but if you're feeling adventurous, you should try it!

I got so tired of getting the same meal over and over again and not trying new dishes (because as a cook, what's the point of going out but to get a meal you would never make at home or to see what fun combinations are out there?!) that I decided to figure out how to make the meal myself.  And we both agree - what I came up with is pretty darn-tootin' close!  It does take a little planning, but it's not overly labor intensive. 

Curried Banana Spinach Pie
Serves 4

  • 1 large bag loose leaf spinach  - or 2 smaller ones
  • 2 t all-spice
  • 2 large bananas - sliced
  • 11/2 c creamy curry sauce
  • 8 good sized falafel balls (usually one recipe's worth)  My falafels tasted good, but fell apart while cooking, so I need to research why that happened or try another recipe like the one I have linked!
  • Slices of provolone cheese
  • 1 pizza dough crust divided into 4 smaller balls
--Saute the spinach either on the stove or in the microwave so it cooks down.  Drain and add the all spice.
--Roll the dough balls out into 4 thin circles.  Smear 1/4 c of curry sauce on each, then a pile of spinach, and then crumble the falafel.  If should look like this (but with a little more spinach and falafel):


--Now layer the cheese, smear more sauce on top and use it as "glue" for the banana slices.  (you don't HAVE to use bananas, we just feel it's better this way.  You could also use some extra garbanzo beans to "beef" it up)


--Fold the dough up and over or even like a calzone and bake for 20 minutes at 350.

When you're all done - it should look something like this!


Creamy Curry Sauce

This is a great curry recipe.  I made it for another dish, so no picture of just the sauce.  Sorry.

But here's the recipe!  Try it in other dishes, on rice and veggies, in a stir-fry, or maybe even in a Thai Panang or Curry.  That's what I'm going to do!

Creamy Curry Sauce
Makes 4 cups
  • 1 medium onion - finely chopped
  • 2 t minced garlic
  • 1 t ginger
  • 1 1/2 c whole milk
  • 1 1/2 c coconut milk
  • 1 can tomato paste
  • 1 1/2 T Curry powder
  • 1/2 t cumin
  • 2 T sugar
  • Some light tasting oil - like sunflower or grape seed or extra virgin light OO 
--In a saucepan, saute onion in oil until transparent.  Add garlic and ginger until fragrant - about a minute.
-- Add remaining ingredients.  Bring to a boil, reduce heat and simmer, covered, for 15 minutes.
--Let cool and then blend until smooth.

Thursday, August 11, 2011

Caprese Burgers


I got the idea for this burger from Mama Pea's Yukon Gold White Bean Burger recipe.  It looks totally delicious, don't you think?  But I thought to myself - fresh basil and tomato?  Umm...sounds a little like a Caprese Salad to me, minus a couple ingredients!  All we need is a little Mozzarella and some Balsamic vinegar in there somewhere.

So this is my twist on a fabulous burger.  And they were amazing!  My only issue is that the recipe only makes 4, so there were no leftovers.  Very sad.

And for the vegans out there, just omit the cheese (or do a non-dairy version) - it'll be great either way!

Caprese Burgers

Serves 4

  • 1 can white beans - any will do -- rinsed and drained
  • 1/2 lb Yukon Gold, or even New Red potatoes - steamed
  • 2 cloves of garlic - minced
  • 1 T Nutritional yeast
  • 2 T whole wheat flour
  • 1 T balsamic vinegar
  • 1/4 c chopped FRESH basil
  • 1 t thyme (dried)
  • 4 buns
  • Tomato for slicing
  • Mozzarella if using
  • Other toppings of your choice
 -- Place beans, steamed potatoes, nutritional yeast, flour, and vinegar in a bowl and mash until they all clump together. 
-- Stir in chopped basil and thyme.
-- Form into 4 patties.  Chill for just a little bit to firm up -- they hold up better.  Pan fry or pan "grill" 4-5 minutes on each side.
-- Put it on a bun (toasted) with whatever you have on hand.  But if you're wanting that Caprese taste - make sure there are tomatoes and mozzarella on there!

    Wednesday, August 10, 2011

    Recipe Index TAB

    You may have noticed the new tabs on the blog.  They are a work in progress.

    Today, though, I finished the recipe index.  So now you can browse all the recipes alphabetically or quickly find a recipe you remember seeing without having to scroll through all the pages to locate it! 

    Have fun!

    Sweet Potato Hash


    This was a "throw together" dish that actually turned out quite nicely.  I got the idea from a Mollie Katzen recipe and just tweaked it to my liking. It was super easy and full of flavor -- just that way I like it!  I sort of just kept adding things until it tasted just right!

    This is a perfect meal for the summer because you don't have to use the stove at all it you don't want to.  Gotta love keeping the heat index down inside your house, right?  Or is that just little ole me with out any central AC talking?  I put this in a bowl with a huge salad as a side, but you could easily put it in a pita over some greens with some Greek yogurt on top!  Have fun with it!

    Sweet Potato Hash
    Serves 6-8
    • 6 c peeled and cubed (1/2 inch) sweet potatoes
    • 1 can black beans - rinsed and drained
    • 1 1/2 c sweet corn
    • 1 t garlic powder
    • dash or two of red pepper (to taste)
    • 1 T cumin
    • 1 T cardamon
    • 1/2 c Orange Juice (the better quality, the better tasting dish)
    • Sliced scallions for the top
    • 3 cups cooked quinoa (that's 3 cups water, 1 1/2 c dry quinoa cooked like rice on the stove or in a rice cooker)
    --  Start the quinoa
    -- Combine everything except the scallions and quinoa in a large microwave safe dish.  It would be particularly good if this dish had a lid.  If not, cover it and cook for about 10 minutes.  Stir.  Cook it again for another 10 minutes until the potatoes are soft.

    -- Mix in the quinoa to the vegetables until evenly distributed. (You could also just have beds of quinoa on the plates and top it with the "hash")
    -- Top with scallions and enjoy!

    Saturday, August 6, 2011

    And the adventure begins...


    Over the last week or so I have been mulling over the idea of starting a "new" food blog.  More like just changing the name, really, to get away from using our last name for privacy purposes.  Not like I thought someone is going to stalk me and come to my house because they ate something that upset their stomach or anything, but more because I didn't like that someone I didn't know could google our name and find us.

    I have no aspirations of growing this blog to become as big as wonderful blogs out there like Oh She Glows, Peas and Thank You, or The Pioneer Woman Cooks.  All fabulous blogs with amazing pictures and cookbooks to show for their hard work.  Nope, not me.  Not where I am right now in life. And I'm ok with that.

    The point of this blog is to present those interested in heart healthy recipes for their families that don't cost an arm or a leg in time or money.  But none of that cutting into the taste or satisfaction of the meal.  We are a hearty health conscious family and the recipes here do reflect that.  That does not mean I don't have recipes laden with cheese on here, nor does it mean I use tons of wild and hard to find ingredients.  I'm just a stay at home mom to two energetic boys and I like to cook (and write -- it is what I went to college for after all!)

    Although...I didn't always like to cook.  I'll have to share some pretty hilarious stories of some of the meals I served (and was proud of serving) when I was a new wife.  They'll  have you laughing as much as they had me crying.

    And lastly, the name.  Over the last week the time put into thinking up a name and researching it to see if it was taken or not is bordering on extreme.  I can not tell you how many times I thought up, or someone else gave me, the perfect name only to google it and find that it was taken.  Restaurants, books, blogs, plain old .coms.  It was slightly disheartening.  I wanted a name that spoke to the heart health of the meals I make and this, I feel, does that.  The meals are hearty, both in substance and health, and I hope that what I bring to the blogging world is helpful, as well as tasty.

    I get a lot of my recipes from other sites, like the ones listed above, as well as friends, and some of my mother's old cookbooks.  I like to think of myself as a recipe/taste-tester and you all get the result.  I will give credit where credit is due and link to the original if possible and also note the changes I made and why (because if you've been following me for long, you know it is rare when I find a recipe I don't "tweak").

    Please, if you like what you just read and would like to see what is going to be coming, follow me (click on the button on the right of the page), subscribe with an email address (that I never see) to be sent updates, and share me!

    Thursday, August 4, 2011

    Chocolate Covered Banana Bites


    I saw this recipe on (never home)maker earlier this week and literally went to the store the next day to get the chocolate chips to make these amazingly delicious frozen treats. They are so good.

    So good!

    As in, I'm trying to not think about the 17 pieces of nice cold bananas slathered in peanut butter and chocolate sitting in my freezer right now.

    Have self control. Have self control.

    Ok. Now that I'm focused again, these little babies were so incredibly easy to make. I doubled the recipe, because with 2 little dudes and a hubs, there was no way I was getting away with making just a dozen of these sweet treats!

    I tried it originally with equal part PB and chocolate, and maybe it's just my taste buds, but it was too much peanut butter for me. Also, I used the fresh ground PB we get from Whole Foods, and while it still tasted great, I will use conventional creamy PB next time for easy dipping/spreading. :)

    Chocolate Covered Banana Bites
    Makes 12 bites

    • 2 ripe (but not overly so) bananas - cut into 12 pieces total
    • 1/3 c chocolate chips
    • 1/4 c creamy PB
    • Coconut flakes
    -- Peel and cut your bananas
    -- In a microwave safe dish, (I used a 1 cup Pyrex measuring cup for ease in the dipping department) melt the chocolate and PB together - stirring to combine. YUM!
    -- With a fork, take a chunk of banana and dip it into the chocolaty goodness. (You want your bananas firm enough to withstand "stabbing")
    -- Transfer to a tin foil/wax paper/parchment paper covered plate
    -- Repeat until the last one has been coated.
    -- If there is any remaining, reheat a little to soften it up and drop the extra lovins on the bananas to coat them even more. I didn't do this because my bananas were just extra coated and I had barely enough left over.
    -- Now sprinkle the chocolate covered babies with coconut flakes.
    -- Freeze for about an hour (you can eat the, now, but they're not as good. Wait to eat until they are frozen through and the bananas taste like ice cream!) and then transfer them to an airtight plastic container and continue freezing until ready to eat.

    Scot's Oats

    [Source]


    My dear husband has steel cut oats for breakfast every morning.

    Every morning.

    And if you've ever labored over the stove for the 45 minutes it takes to make a batch (6 servings) of steel cut oats, stirring and stirring and making sure they don't burn, and stirring some more, getting hot and sweaty in the process, then you know where I'm coming from.

    He swears by them, of course. But seeing as I'm not an oatmeal kind of gal, I'll just have to take his word for it. They are heartier, healthier, and tastier than conventional oatmeal so I'm told, and who knows, maybe this winter, on one of our horribly bitter cold days, I'll try some. Maybe.

    Anyway. It's summer time and we're trying as much as we can to not turn the stove or oven on at all. But you can't quite microwave steel cut oats, they do require the use of the stove.

    So I researched and found that you can actually overnight cook them - reducing the stove's on-time from 50 minutes to only about 15! Score!

    The finished product.                                                                                 


    Here's what we do.

    Scot's Steel Cut Oatmeal
    Serves 6


    • 6 c water
    • 1 1/2 c steel cut oats
    • 1/4 c wheat germ
    • 1/4 c ground flax seed
    • 1/2 - 1 c natural applesauce or bananas (that means "no sugar added")
    • 1 T cinnamon

    Other add-ins once it's done cooking: fruit, nuts, raisins, craisins...the list is really endless

    --Heat water to boil, add oats, stir and let it boil for 1 minute.
    --Cover and turn off heat. Leave overnight.
    --In the morning, turn the heat back on and cook for 7-10 minutes until it's all done. During this time, add in the wheat germ and flax seed (for extra protein and fiber), applesauce and cinnamon. (or whatever else you want)
    --Once it's done, you can store it in an airtight container in the refrigerator for up to a week. Each morning, just scoop some into a bowl with a little water and microwave until it's warm enough! Add whatever you want on top and you're good to go!

    Tuesday, August 2, 2011

    Brazilian Black Beans


    This was a close save as far as recipes go. When I was meal planning this recipe from The Moosewood Cookbook caught my eye. So I wrote down the ingredients, went to the market, and came back. I put the ingredients away and when I went to pull out the recipe the other night, I looked through the directions for the first time and realized that it was a soup.

    Oops.

    It's over 90 degrees here right now and soup does not interest me, and since we don't have central AC, I am not about to turn on the stove to saute, boil, simmer, and all that hot jazz.

    So after a quick thought, I decided I would make the recipe work into something that I had envisioned. A mass of wonderfully tasty beans over some brown rice. And with some tweaking to the soup recipe, I did just that. Play around with it and make it yours, too. That's the fun with recipes, right?

    Oh, and this took about 30 minutes to put together and there was no need to turn the oven on. Score. And we served this along side a nice hearty salad.

    Brazilian Black Beans
    Serves 6
    • 3 cans black beans - rinsed and drained
    • 3/4 c chopped carrots - about 1 large carrot (I gently chopped mine in the food processor. Easier for little teeth to eat, I say)
    • 2 ribs of celery - thinly sliced
    • 3 scallions - thinly sliced (both green and white)
    • 2 large oranges - peeled, slices apart, and chopped into bite-sized pieces.
    • zest from one of the oranges!!
    • 2 t cumin
    • 1 t coriander
    • 1 t ginger
    • some garlic powder to taste (because raw garlic would be just too powerful in this dish)
    • 1/2 c orange juice
    • 1 T dry sherry
    • couple dashes of red pepper for some heat
    • S & P to taste
    • 3 -4 c cooked brown rice depending on how much rice you want with the beans
    -- Start your rice and then start chopping and slicing
    -- Mix the beans, carrots, celery, scallions and orange chunks all together in a large bowl.
    -- Mix the orange juice, sherry, zest and all the spices in a small bowl and whisk until blended.
    -- Pour the "sauce" over the bean mixture and stir til combined. Chill until ready or eat right then.
    -- Put it on a bed of brown rice and top with some plain yogurt if you want.

    Stay tuned this fall for the soup version of this. :)


    Like what you see? Join the site to get updates in your reader/feed or subscribe with your email address. Also, I would love feedback if you try something, change something, or just want to say hi.